PPT Template for IV Insertion and Removal


37 Slides1.09 MB
PPT Template for IV Insertion and Removal
Overview Review of knowledge and skills required for peripheral IV access Supplemental period of structured on-thejob training and competency evaluation for each individual is required in order to successfully apply this knowledge in a clinical setting
Learning Objectives Identify legal and policy considerations in regard to IV placement Define the proper technique and procedure for PIV insertion and removal Identify appropriate intravenous access sites
Learning Objectives Demonstrate the ability to properly insert a PIV Demonstrate the ability to properly remove a PIV Recognize complications that can occur with IV insertions Demonstrate appropriate documentation of PIV insertion and removal
Definitions Peripheral Intravenous (PIV) Catheter: A short (less than or equal to 7.5 cm) intravenous catheter inserted into a peripheral vein. A PIV permits short-term access of the venous system for intermittent or continuous infusion therapy. Infiltration: Inadvertent administration of a non-vesicant medication or solution into the surrounding tissue. Signs and symptoms can include skin blanching, edema, skin cool to touch, and/or pain.
Definitions Extravasation: Inadvertent infiltration of vesicant medications or solution into surrounding tissue Extension Set: Tubing (approximately 15 cm in length) attached to the PIV cannula at time of insertion
Legal/Policy Considerations Laws concerning medication administration vary by state Most hospitals also have institutional policies regarding who may insert IV’s and/or administer medication (including ultrasound enhancing agents (UEA) and saline contrast Starting PIVs requires hospital approval, knowledge of sterile technique and venous anatomy, and awareness of associated risks
Legal/Policy Considerations For non-nursing staff, many hospitals have IV courses and a certification process Participation in this course does not completely prepare you to insert/remove PIVs A competency–based program must also be completed at your facility
Overview of Venous Anatomy Use appropriate graphics/resources here
Potential Complications of IV Insertion Infection Infiltration Extravasation Phlebitis Hematoma/bruising
Typical Required Supplies Gloves Tourniquet Alcohol wipe Sterile Gauze 20 or 22 gauge angiocatheter Lidocaine for anesthesia if indicated Tape or transparent dressing Sterile Saline Syringe (fill syringe with saline) Heparin lock or extension set (prime extension set with saline) Band-Aid
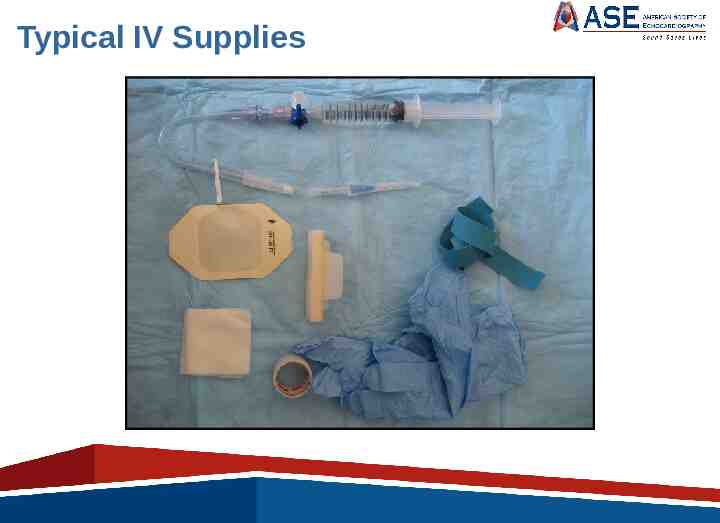
Typical IV Supplies
Prepare Patient Identify patient and obtain consent according to institutional policy Obtain relevant medical history/allergies Ask patient if they have had prior problems with or contraindications for IV starts
Contraindications for IV Placement Below site of existing phlebitis In arm with dialysis access On side of mastectomy or axillary node dissection Lumpectomy not a contraindication
Special Considerations Obese patients Elderly Rolling veins
Prepare Patient Explain procedure according to institutional policy, allowing time for questions Place patient in a supine position HAND HYGIENE
Hand Hygiene Cleanse hands per institutional policy, with attention to space in between fingers and nail beds Cleanse before AND after IV insertion Wet hands and apply soap or use antimicrobial cleanser
Potential for Infection During the use of intravenous devices, micro-organisms may enter the blood stream and cause Local/systemic infections Prolonged hospitalization Increased morbidity/mortality Risk of infection can be minimized by appropriate universal infection prevention measures
Hand Hygiene Centers for Disease Control (CDC) Recommendations Observe proper hand-hygiene procedures by either washing hands with conventional antiseptic-containing soap and water or with waterless alcohol-based gels or foams before and after palpating insertion sites Use of gloves DOES NOT obviate the need for hand hygiene
Hand Washing Tips Scrub per institutional policy Rinse hands from the fingertips to wrist Dry your hands with paper towel Don gloves
Choice of Site Site influences risk for catheter-related infections and phlebitis Lower extremity sites have higher rate of infection Hand veins have lower risk than do veins on the wrist or upper arm Veins typically considered for PIV placement are those found on dorsal and ventral surfaces of the upper extremity, including the metacarpal, cephalic, and basilic veins
IV Insertion Video Optional videos may be inserted here
Inspect Arm Inspect and palpate inner aspects of both arms. Avoid areas of bruising, recent IV sites, or scarring Identify appropriate site Start with distal sites and move centrally as needed
Place Tourniquet Place tourniquet about 3 inches above antecubital fossa or 3-5 inches above more distal site Should be snug enough to occlude venous flow Tourniquet should be placed so you will need only one hand to release it
Vein Selection Palpate for appropriate vein (straight, long, soft and bouncy) Tips Ask patient to open and close fist Lower arm below level of heart Warm compress to assist vasodilatation
IV Placement After identification of site, prepare site Cleanse area with alcohol or povidoneiodine swab, in a circular motion, starting from the center and working out
IV Placement Re-apply tourniquet Prepare catheter for insertion Use thumb to hold skin taut just below catheter insertion site (helps to stabilize the vein) Puncture skin and insert catheter with the bevel up at approximately a 30 degree angle
IV Placement Insert with a smooth steady motion Level to a 15-20 degree angle Observe for blood in the flash back chamber of the catheter While holding the stylet still, gently push the catheter into the vein It should go in smoothly and easily If it does not, do not force it
IV Placement Release the tourniquet Remove needle from angiocatheter while placing digital pressure on accessed vein above insertion site (at the end of the cannula) Immediately dispose of needle in appropriate sharps container
IV Placement Flush catheter with saline to assure it is patent Secure catheter with tape or transparent dressing Place heparin lock, three-way stopcock or extension set on hub of catheter
Site Care Minimize contamination risk by wiping access port with appropriate antiseptic and accessing the ports only with sterile devices Cap all stopcocks when not in use with new sterile caps
Unsuccessful Attempts Remove angiocatheter and apply pressure to venipuncture site General rule: If you are unsuccessful after two attempts, ask for help
IV removal Remove tape while securely holding the catheter and skin Place gauze over IV site and remove catheter Dispose of catheter in approved container
IV removal Apply pressure until bleeding stops (about 1 minute) Apply sterile dressing or band-aid Provide patient with post-procedure instructions Documentation per institutional policy
Typical Documentation Patient education/consent Date/time Ordering physician Responsible individual Location of IV access/catheter size Complications or inability to obtain access Patient status post-procedure
Summary Legal/policy considerations Venous anatomy Pre-procedure Supplies Patient education/consent Hand hygiene
Summary Procedure Identify site Perform venipuncture Post-procedure Remove IV Assess and dress site Evaluate for complications Hand hygiene Documentation