Chapter 3 Plasticity
59 Slides2.83 MB
Chapter 3 Plasticity
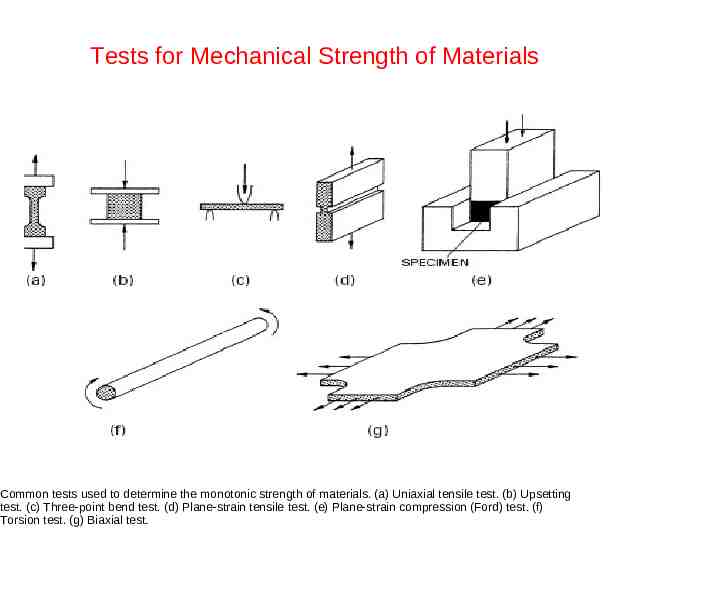
Tests for Mechanical Strength of Materials Common tests used to determine the monotonic strength of materials. (a) Uniaxial tensile test. (b) Upsetting test. (c) Three-point bend test. (d) Plane-strain tensile test. (e) Plane-strain compression (Ford) test. (f) Torsion test. (g) Biaxial test.
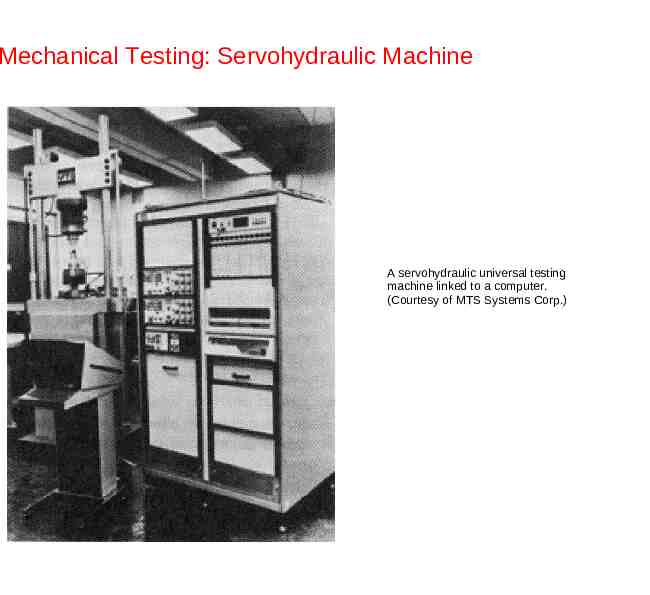
Mechanical Testing: Servohydraulic Machine A servohydraulic universal testing machine linked to a computer. (Courtesy of MTS Systems Corp.)
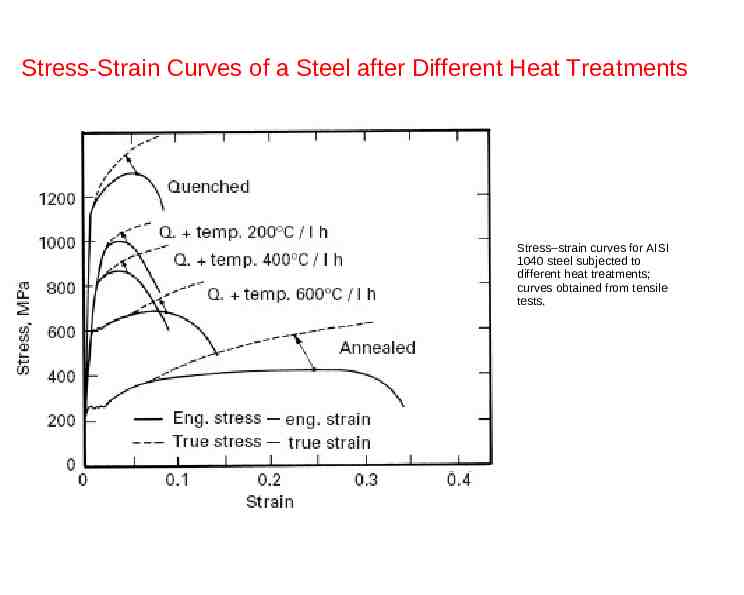
Stress-Strain Curves of a Steel after Different Heat Treatments Stress–strain curves for AISI 1040 steel subjected to different heat treatments; curves obtained from tensile tests.
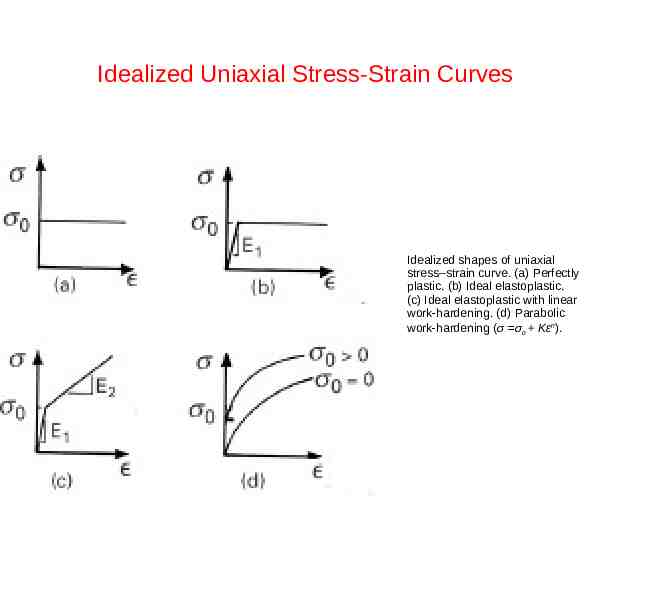
Idealized Uniaxial Stress-Strain Curves Idealized shapes of uniaxial stress–strain curve. (a) Perfectly plastic. (b) Ideal elastoplastic. (c) Ideal elastoplastic with linear work-hardening. (d) Parabolic work-hardening (σ σo Kεn).
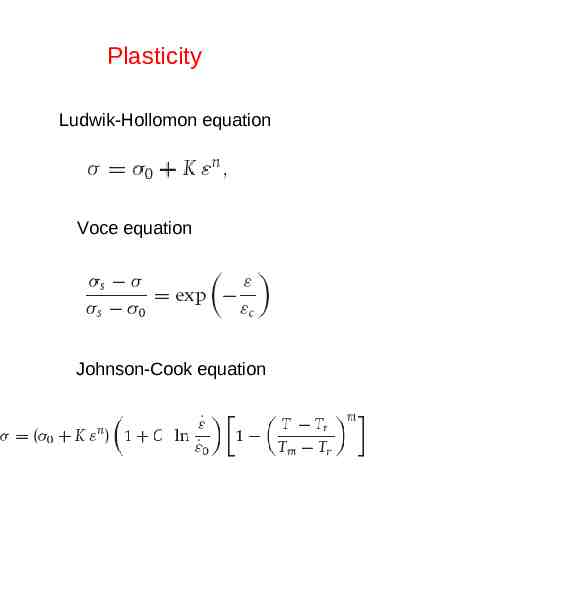
Plasticity Ludwik-Hollomon equation Voce equation Johnson-Cook equation
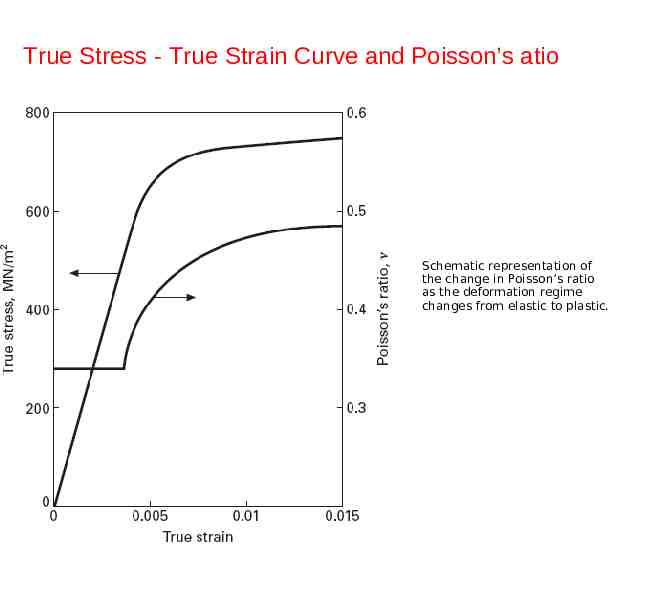
True Stress - True Strain Curve and Poisson’s atio Schematic representation of the change in Poisson’s ratio as the deformation regime changes from elastic to plastic.
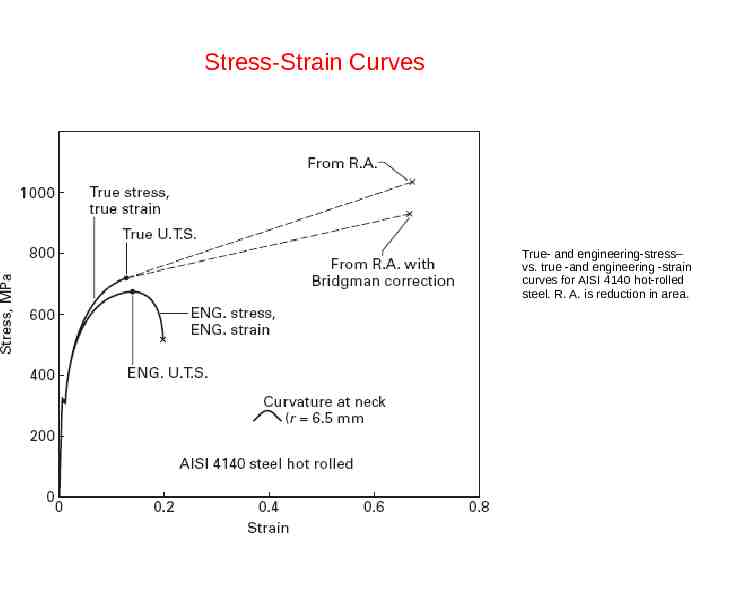
Stress-Strain Curves True- and engineering-stress– vs. true -and engineering -strain curves for AISI 4140 hot-rolled steel. R. A. is reduction in area.
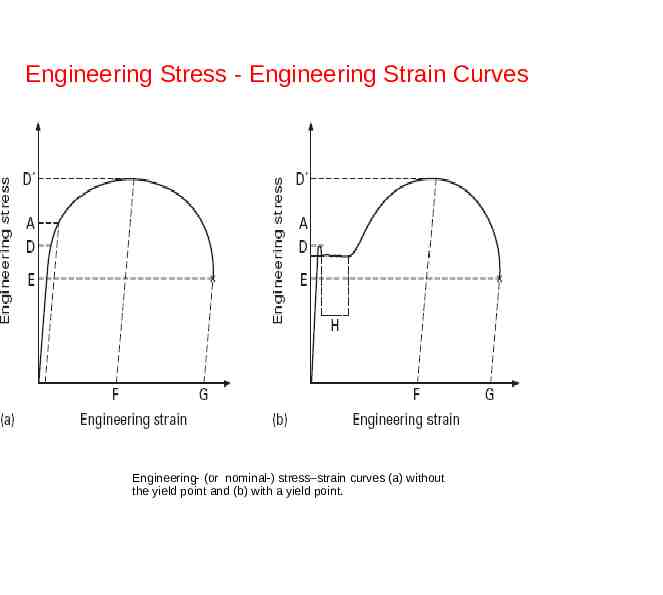
Engineering Stress - Engineering Strain Curves Engineering- (or nominal-) stress–strain curves (a) without the yield point and (b) with a yield point.
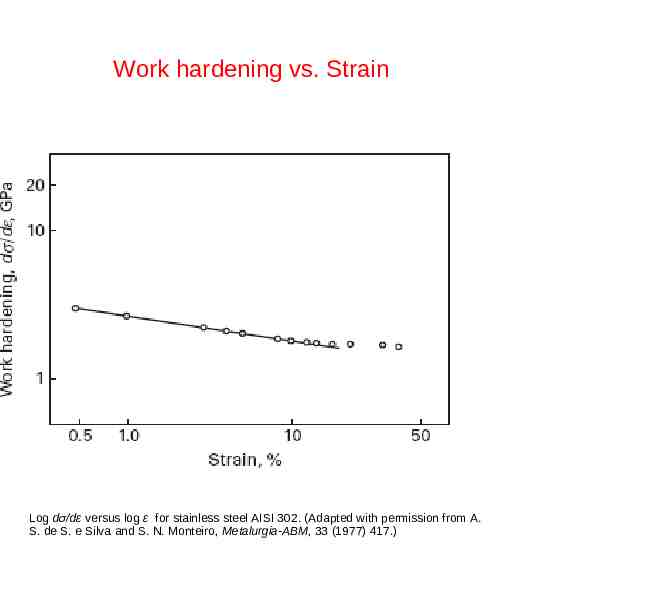
Work hardening vs. Strain Log dσ/dε versus log ε for stainless steel AISI 302. (Adapted with permission from A. S. de S. e Silva and S. N. Monteiro, Metalurgia-ABM, 33 (1977) 417.)
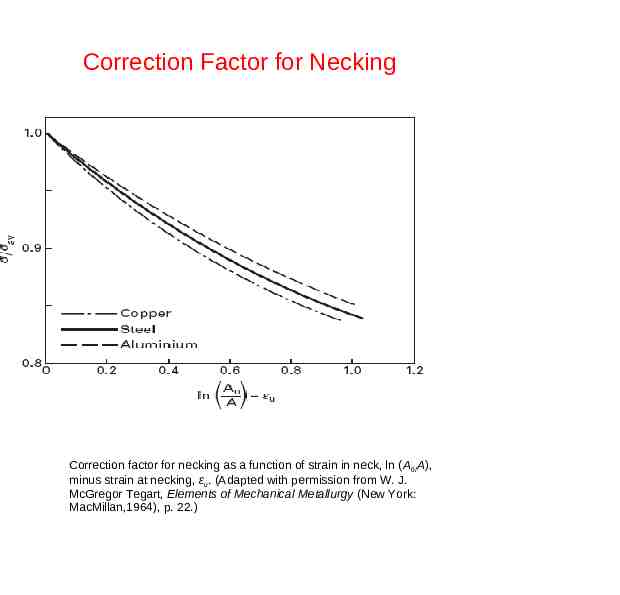
Correction Factor for Necking Correction factor for necking as a function of strain in neck, ln (A0/A), minus strain at necking, εu. (Adapted with permission from W. J. McGregor Tegart, Elements of Mechanical Metallurgy (New York: MacMillan,1964), p. 22.)
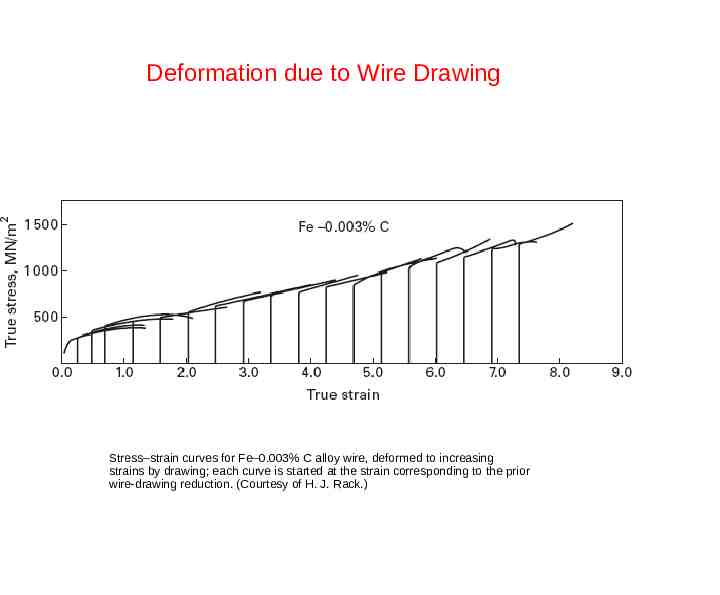
Deformation due to Wire Drawing Stress–strain curves for Fe–0.003% C alloy wire, deformed to increasing strains by drawing; each curve is started at the strain corresponding to the prior wire-drawing reduction. (Courtesy of H. J. Rack.)
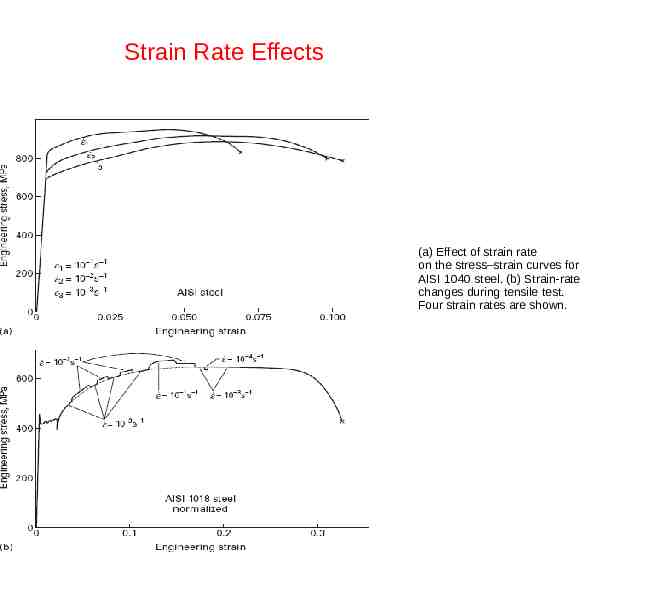
Strain Rate Effects (a) Effect of strain rate on the stress–strain curves for AISI 1040 steel. (b) Strain-rate changes during tensile test. Four strain rates are shown.
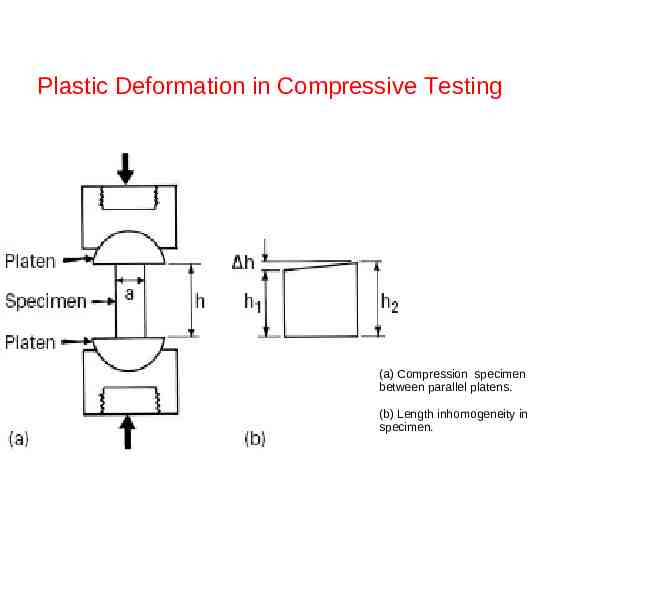
Plastic Deformation in Compressive Testing (a) Compression specimen between parallel platens. (b) Length inhomogeneity in specimen.
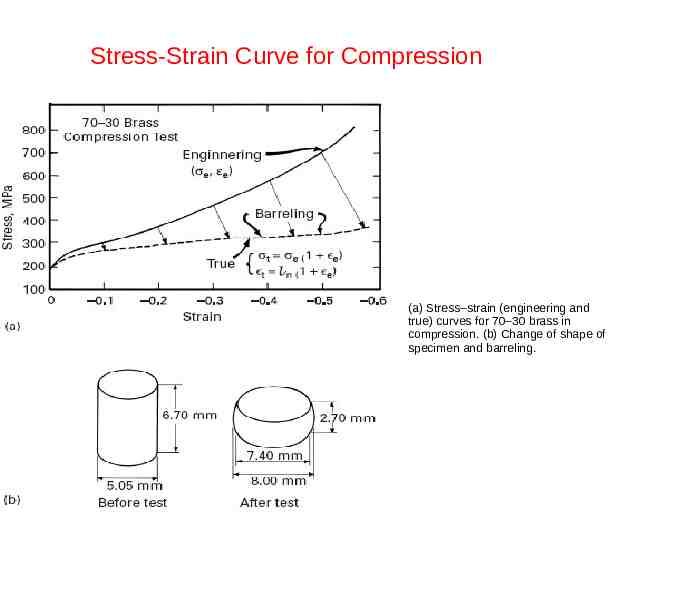
Stress-Strain Curve for Compression (a) Stress–strain (engineering and true) curves for 70–30 brass in compression. (b) Change of shape of specimen and barreling.
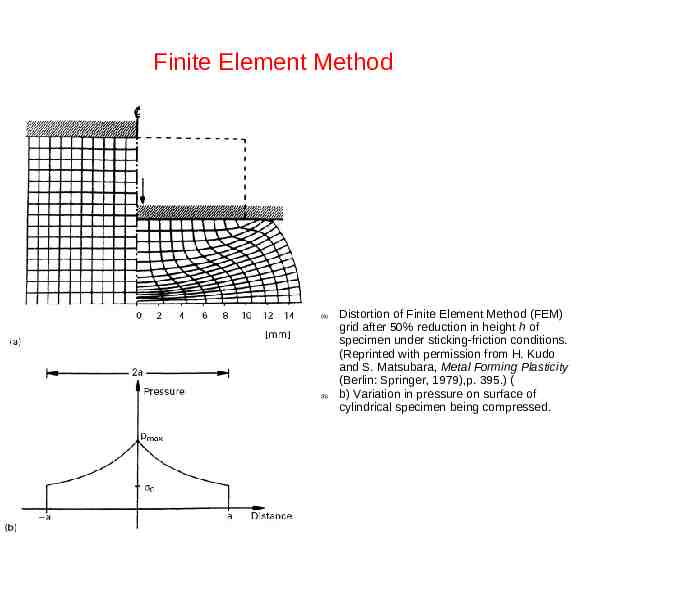
Finite Element Method (a) (b) Distortion of Finite Element Method (FEM) grid after 50% reduction in height h of specimen under sticking-friction conditions. (Reprinted with permission from H. Kudo and S. Matsubara, Metal Forming Plasticity (Berlin: Springer, 1979),p. 395.) ( b) Variation in pressure on surface of cylindrical specimen being compressed.
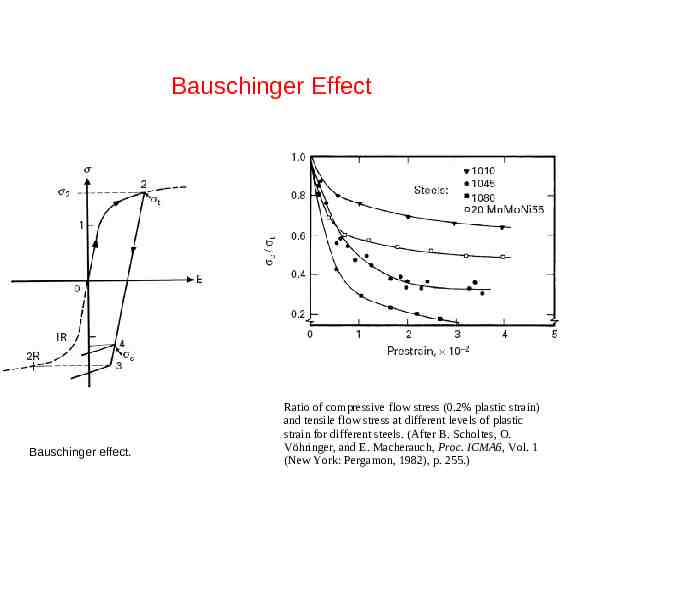
Bauschinger Effect Bauschinger effect. Ratio of compressive flow stress (0.2% plastic strain) and tensile flow stress at different levels of plastic strain for different steels. (After B. Scholtes, O. Vöhringer, and E. Macherauch, Proc. ICMA6, Vol. 1 (New York: Pergamon, 1982), p. 255.)
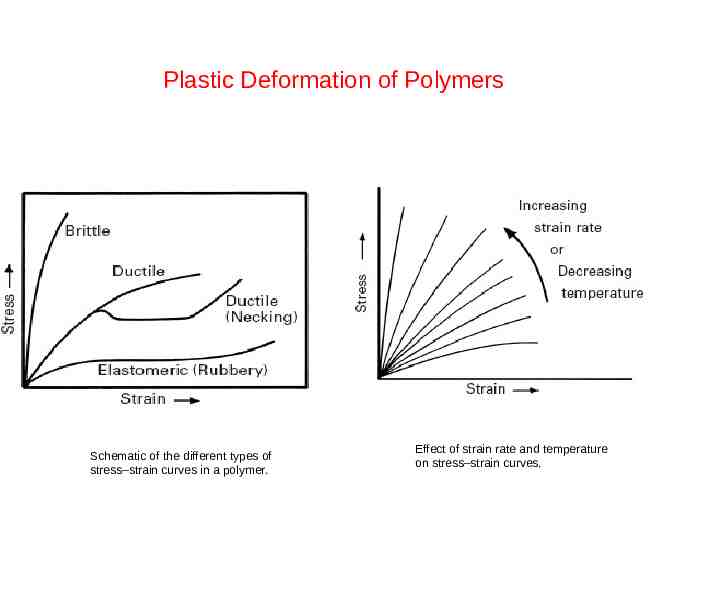
Plastic Deformation of Polymers Schematic of the different types of stress–strain curves in a polymer. Effect of strain rate and temperature on stress–strain curves.
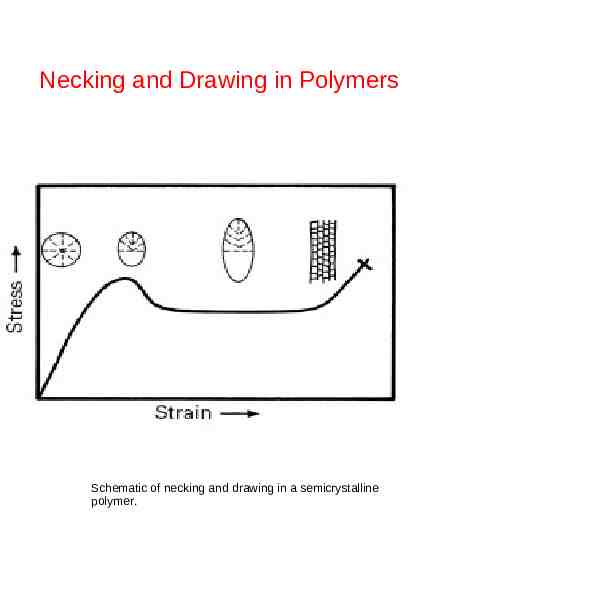
Necking and Drawing in Polymers Schematic of necking and drawing in a semicrystalline polymer.
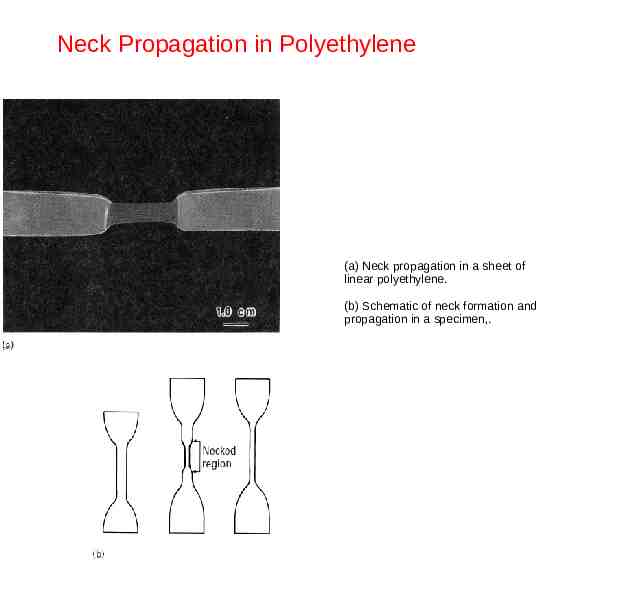
Neck Propagation in Polyethylene (a) Neck propagation in a sheet of linear polyethylene. (b) Schematic of neck formation and propagation in a specimen,.
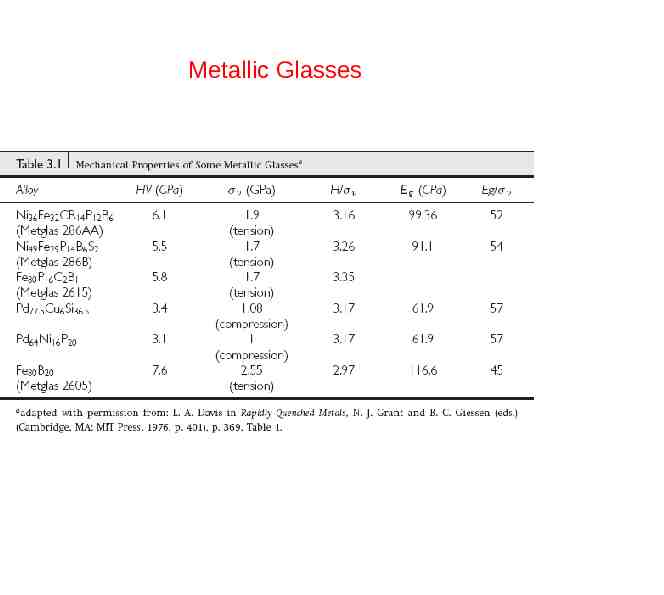
Metallic Glasses
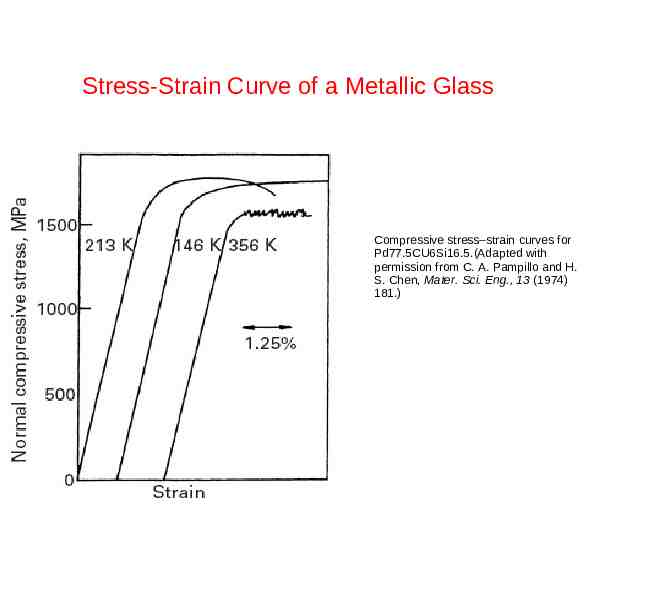
Stress-Strain Curve of a Metallic Glass Compressive stress–strain curves for Pd77.5CU6Si16.5.(Adapted with permission from C. A. Pampillo and H. S. Chen, Mater. Sci. Eng., 13 (1974) 181.)
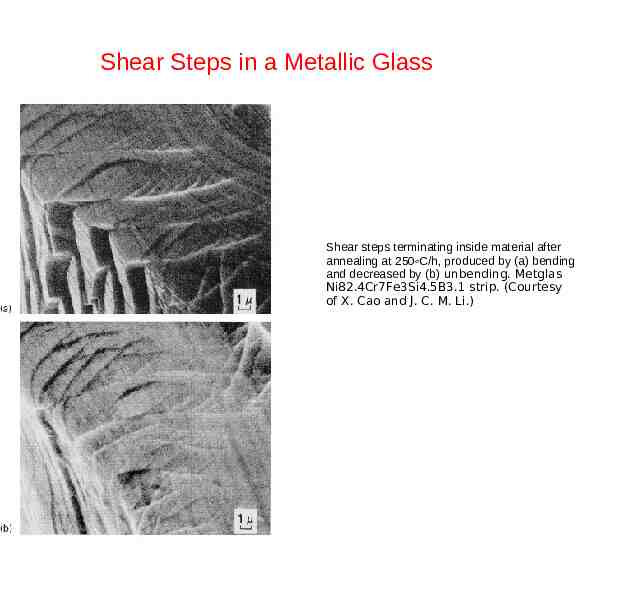
Shear Steps in a Metallic Glass Shear steps terminating inside material after annealing at 250 C/h, produced by (a) bending and decreased by (b) unbending. Metglas Ni82.4Cr7Fe3Si4.5B3.1 strip. (Courtesy of X. Cao and J. C. M. Li.)
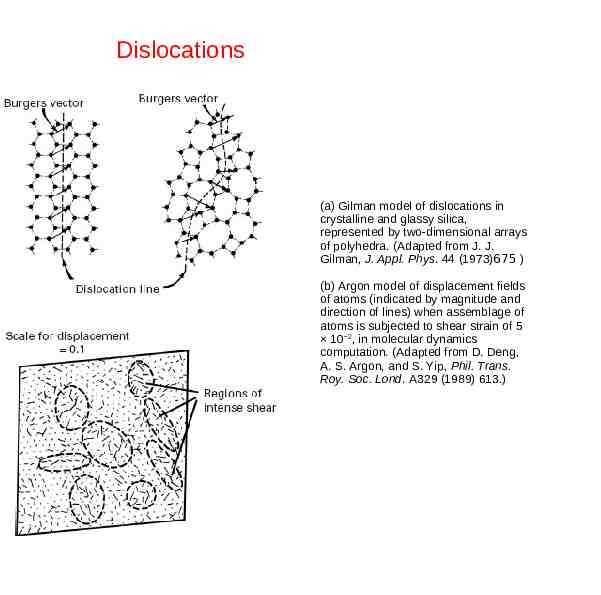
Dislocations (a) Gilman model of dislocations in crystalline and glassy silica, represented by two-dimensional arrays of polyhedra. (Adapted from J. J. Gilman, J. Appl. Phys. 44 (1973)675 ) (b) Argon model of displacement fields of atoms (indicated by magnitude and direction of lines) when assemblage of atoms is subjected to shear strain of 5 10 2, in molecular dynamics computation. (Adapted from D. Deng, A. S. Argon, and S. Yip, Phil. Trans. Roy. Soc. Lond. A329 (1989) 613.)
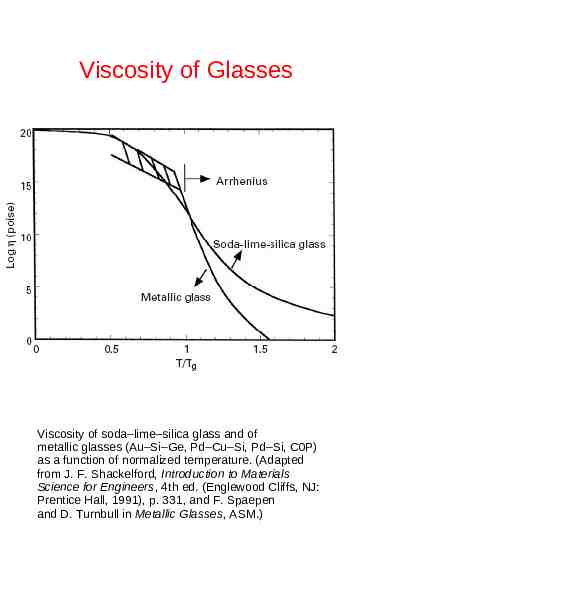
Viscosity of Glasses Viscosity of soda–lime–silica glass and of metallic glasses (Au–Si–Ge, Pd–Cu–Si, Pd–Si, C0P) as a function of normalized temperature. (Adapted from J. F. Shackelford, Introduction to Materials Science for Engineers, 4th ed. (Englewood Cliffs, NJ: Prentice Hall, 1991), p. 331, and F. Spaepen and D. Turnbull in Metallic Glasses, ASM.)
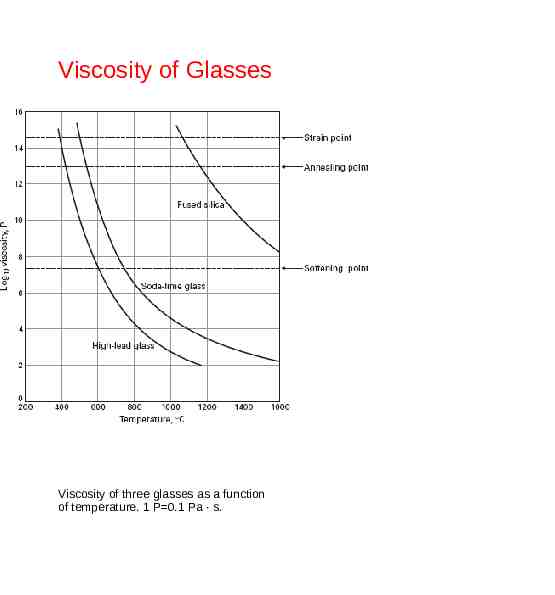
Viscosity of Glasses Viscosity of three glasses as a function of temperature. 1 P 0.1 Pa · s.
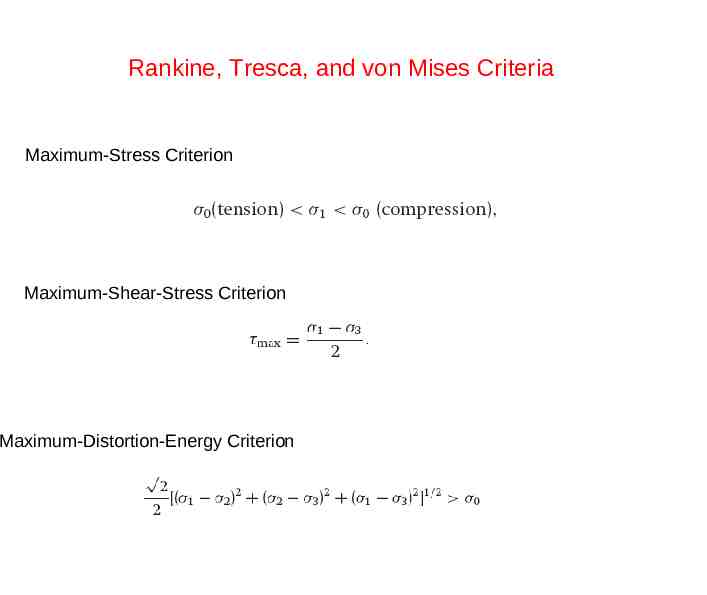
Rankine, Tresca, and von Mises Criteria Maximum-Stress Criterion Maximum-Shear-Stress Criterion Maximum-Distortion-Energy Criterion
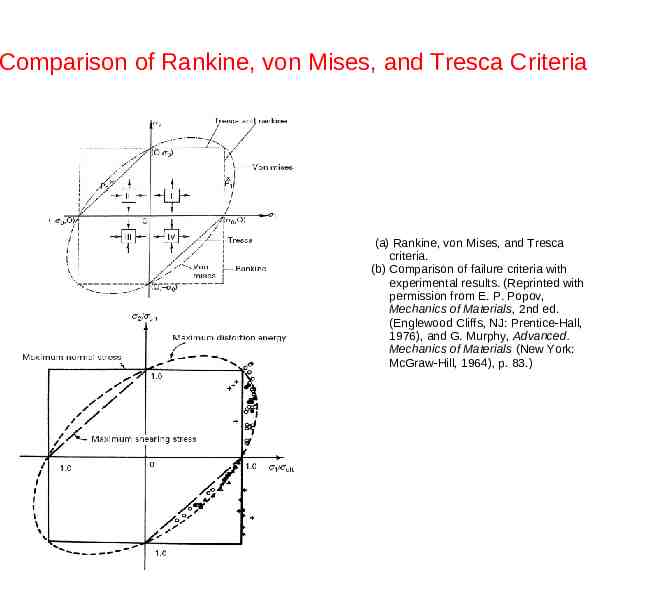
Comparison of Rankine, von Mises, and Tresca Criteria (a) Rankine, von Mises, and Tresca criteria. (b) Comparison of failure criteria with experimental results. (Reprinted with permission from E. P. Popov, Mechanics of Materials, 2nd ed. (Englewood Cliffs, NJ: Prentice-Hall, 1976), and G. Murphy, Advanced. Mechanics of Materials (New York: McGraw-Hill, 1964), p. 83.)
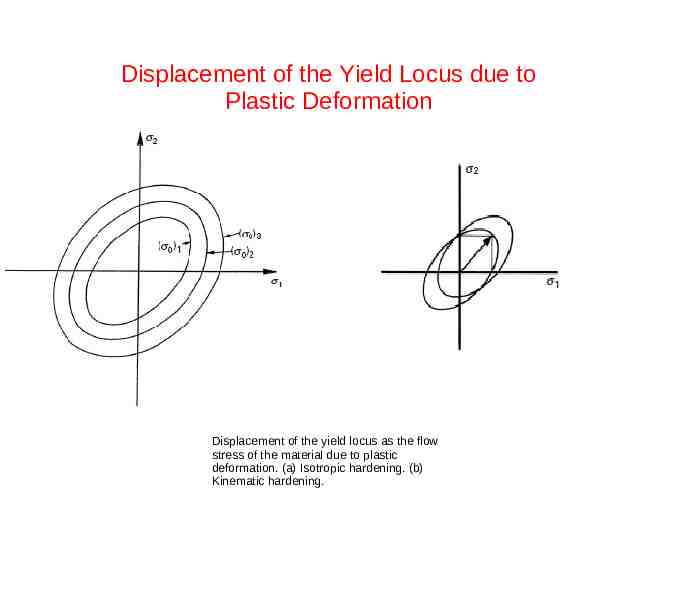
Displacement of the Yield Locus due to Plastic Deformation Displacement of the yield locus as the flow stress of the material due to plastic deformation. (a) Isotropic hardening. (b) Kinematic hardening.
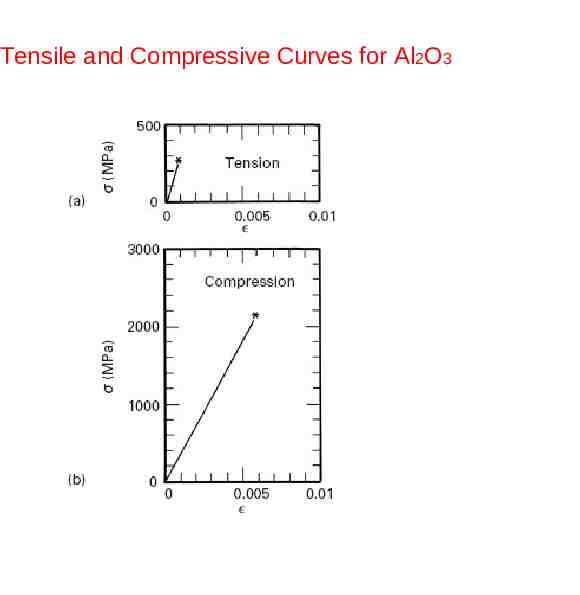
Tensile and Compressive Curves for Al2O3
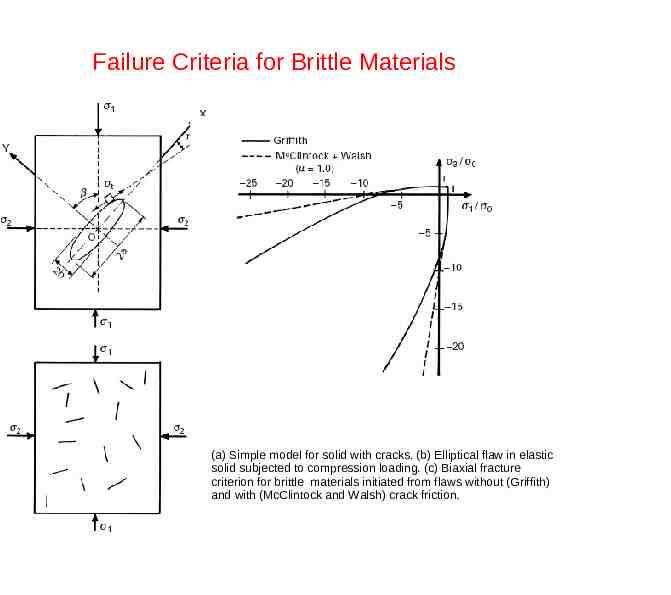
Failure Criteria for Brittle Materials (a) Simple model for solid with cracks. (b) Elliptical flaw in elastic solid subjected to compression loading. (c) Biaxial fracture criterion for brittle materials initiated from flaws without (Griffith) and with (McClintock and Walsh) crack friction.
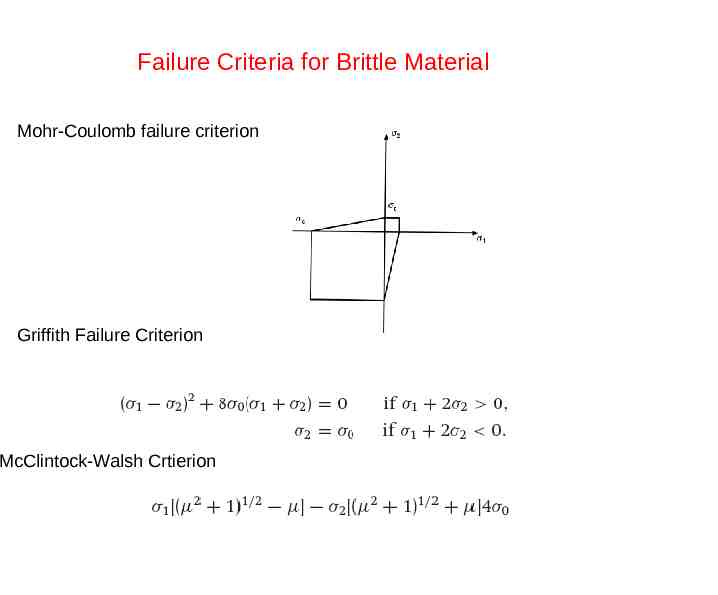
Failure Criteria for Brittle Material Mohr-Coulomb failure criterion Griffith Failure Criterion McClintock-Walsh Crtierion
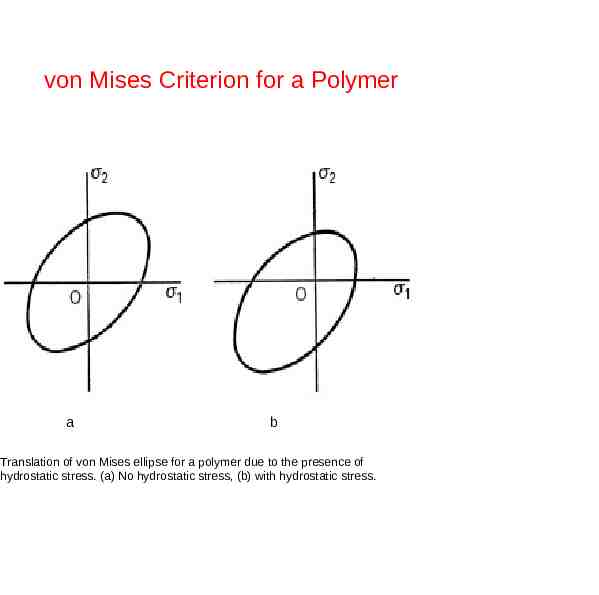
von Mises Criterion for a Polymer a b Translation of von Mises ellipse for a polymer due to the presence of hydrostatic stress. (a) No hydrostatic stress, (b) with hydrostatic stress.
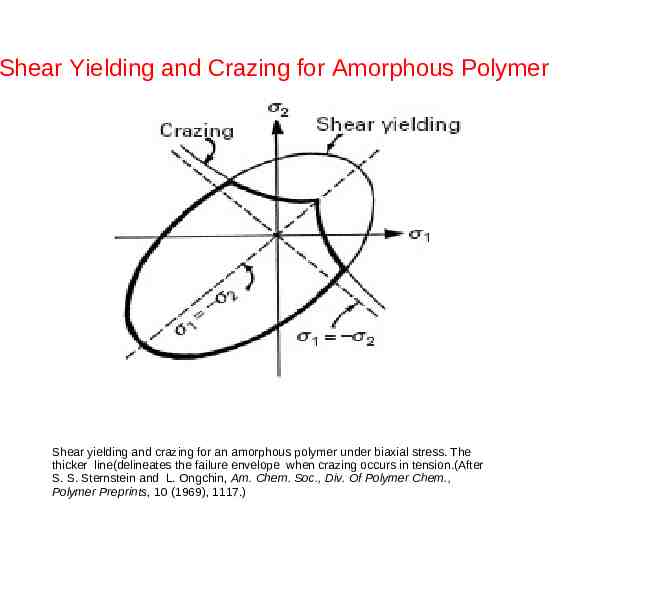
Shear Yielding and Crazing for Amorphous Polymer Shear yielding and crazing for an amorphous polymer under biaxial stress. The thicker line(delineates the failure envelope when crazing occurs in tension.(After S. S. Sternstein and L. Ongchin, Am. Chem. Soc., Div. Of Polymer Chem., Polymer Preprints, 10 (1969), 1117.)
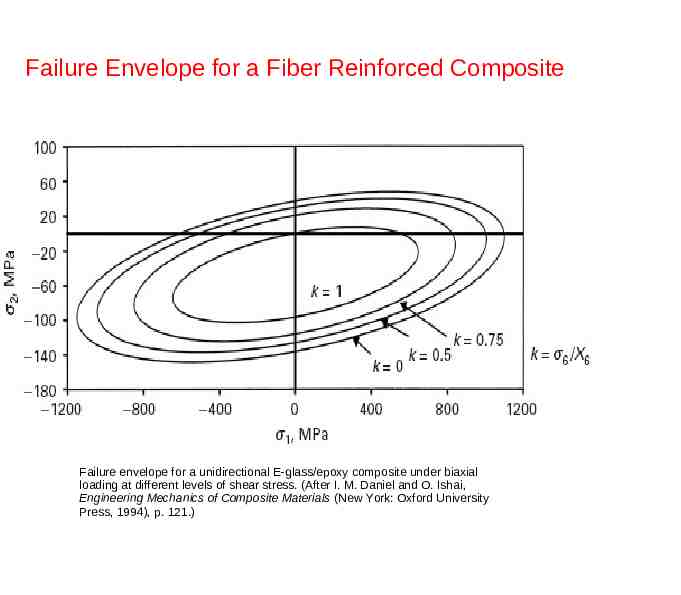
Failure Envelope for a Fiber Reinforced Composite Failure envelope for a unidirectional E-glass/epoxy composite under biaxial loading at different levels of shear stress. (After I. M. Daniel and O. Ishai, Engineering Mechanics of Composite Materials (New York: Oxford University Press, 1994), p. 121.)
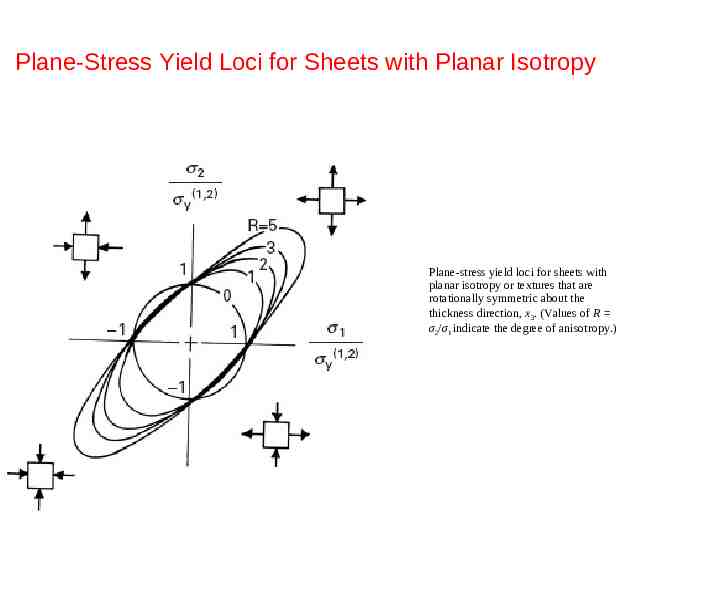
Plane-Stress Yield Loci for Sheets with Planar Isotropy Plane-stress yield loci for sheets with planar isotropy or textures that are rotationally symmetric about the thickness direction, x3. (Values of R σ2/σ1 indicate the degree of anisotropy.)
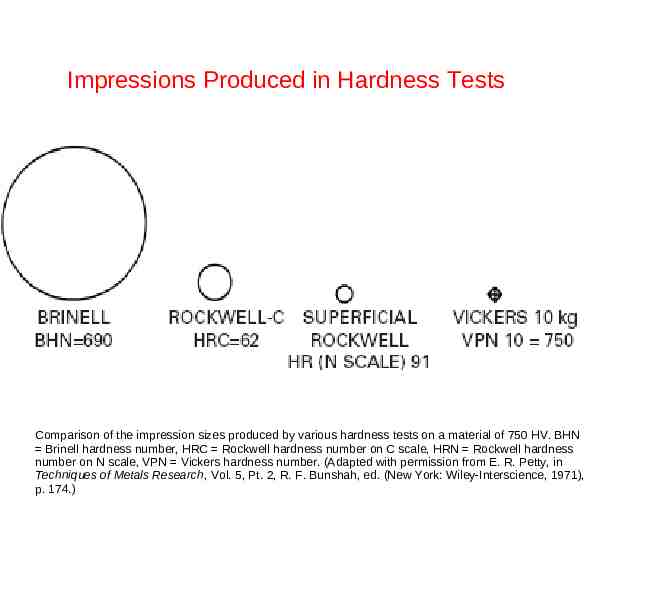
Impressions Produced in Hardness Tests Comparison of the impression sizes produced by various hardness tests on a material of 750 HV. BHN Brinell hardness number, HRC Rockwell hardness number on C scale, HRN Rockwell hardness number on N scale, VPN Vickers hardness number. (Adapted with permission from E. R. Petty, in Techniques of Metals Research, Vol. 5, Pt. 2, R. F. Bunshah, ed. (New York: Wiley-Interscience, 1971), p. 174.)
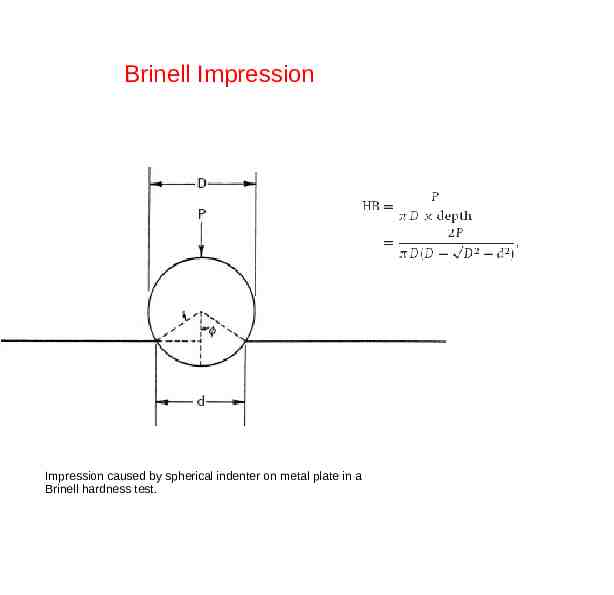
Brinell Impression Impression caused by spherical indenter on metal plate in a Brinell hardness test.
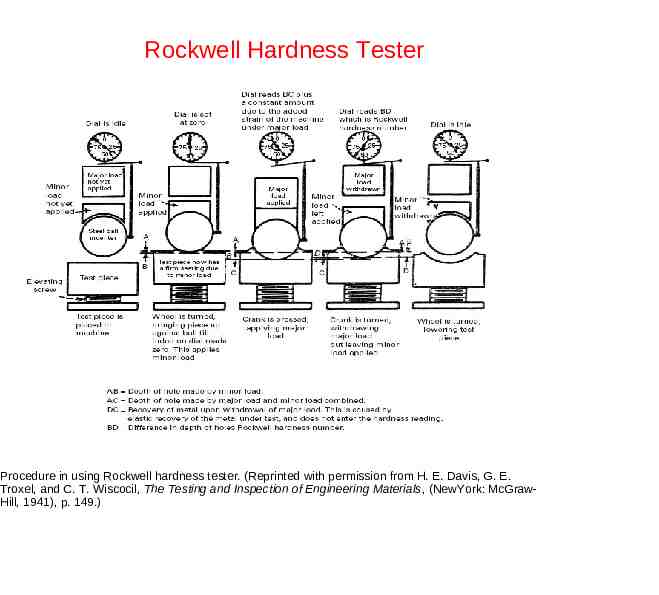
Rockwell Hardness Tester Procedure in using Rockwell hardness tester. (Reprinted with permission from H. E. Davis, G. E. Troxel, and C. T. Wiscocil, The Testing and Inspection of Engineering Materials, (NewYork: McGrawHill, 1941), p. 149.)
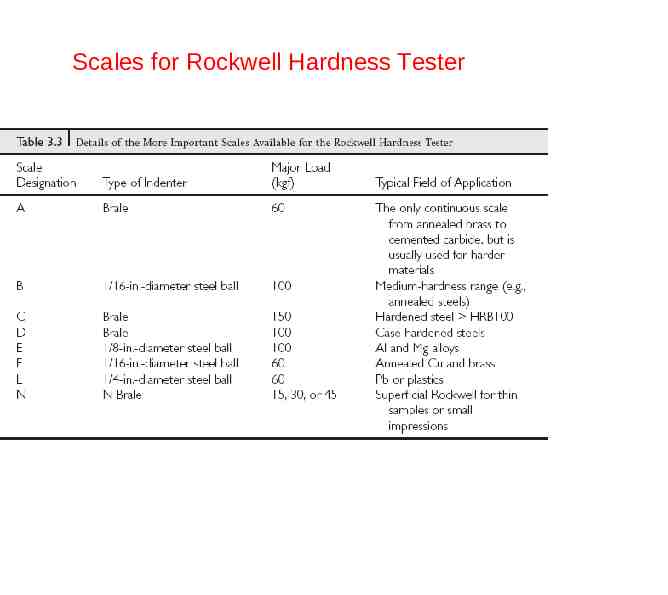
Scales for Rockwell Hardness Tester
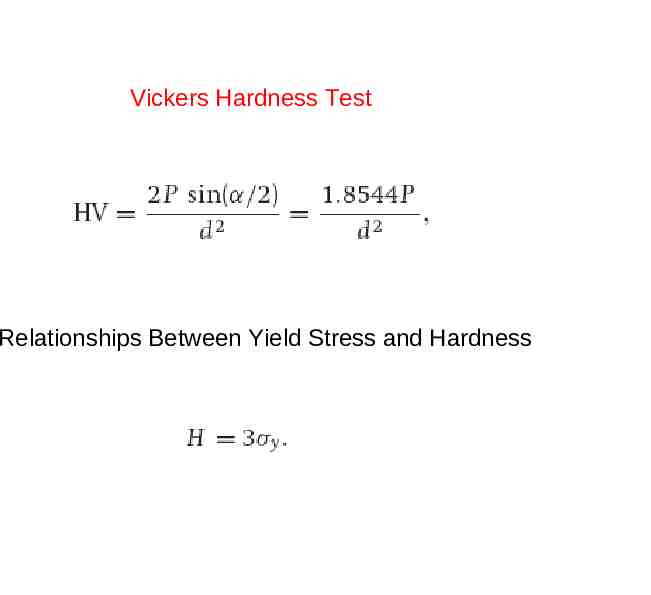
Vickers Hardness Test Relationships Between Yield Stress and Hardness
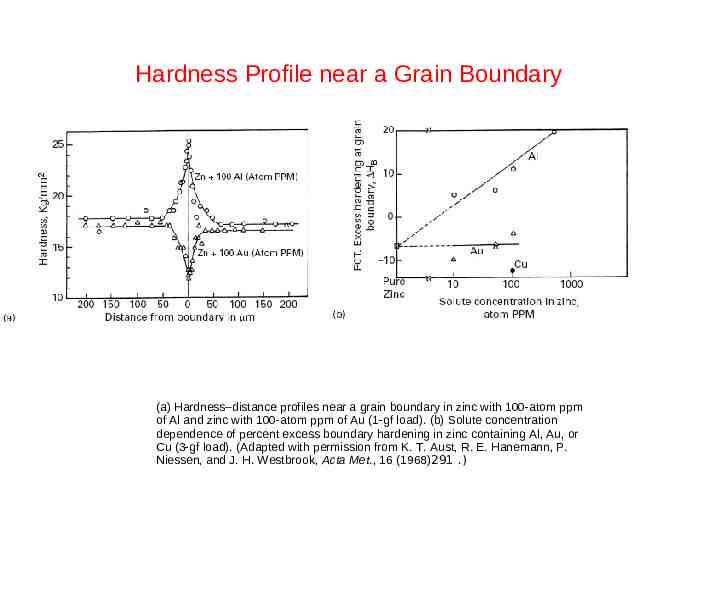
Hardness Profile near a Grain Boundary (a) Hardness–distance profiles near a grain boundary in zinc with 100-atom ppm of Al and zinc with 100-atom ppm of Au (1-gf load). (b) Solute concentration dependence of percent excess boundary hardening in zinc containing Al, Au, or Cu (3-gf load). (Adapted with permission from K. T. Aust, R. E. Hanemann, P. Niessen, and J. H. Westbrook, Acta Met., 16 (1968)291 .)
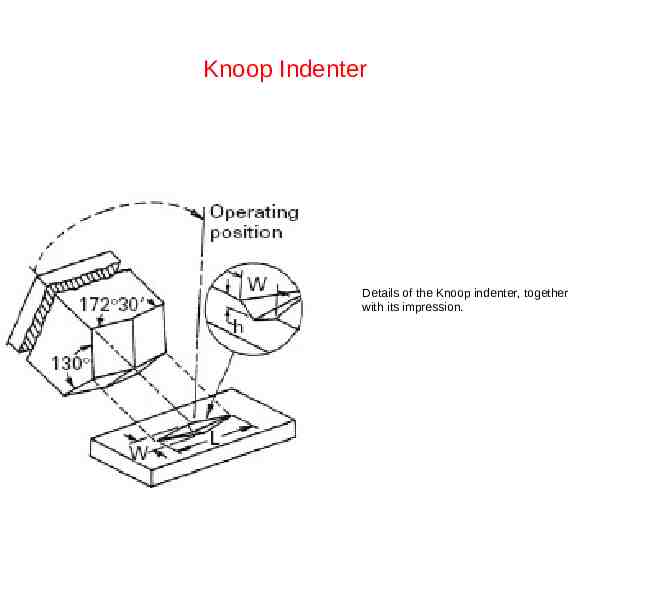
Knoop Indenter Details of the Knoop indenter, together with its impression.
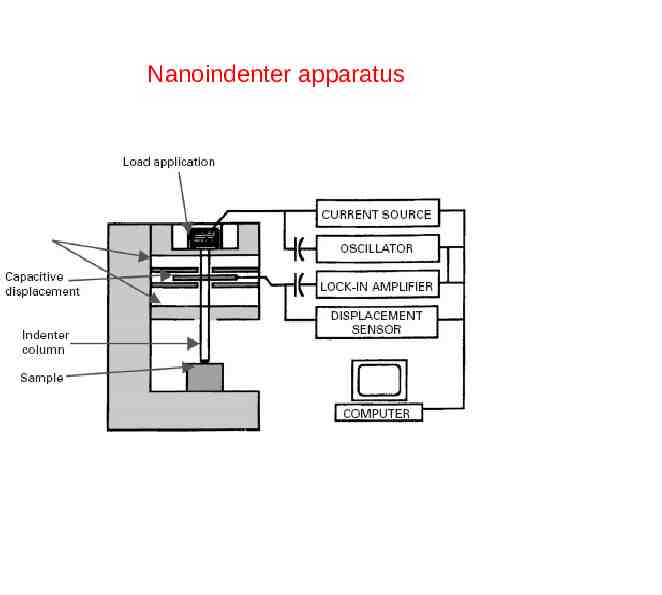
Nanoindenter apparatus
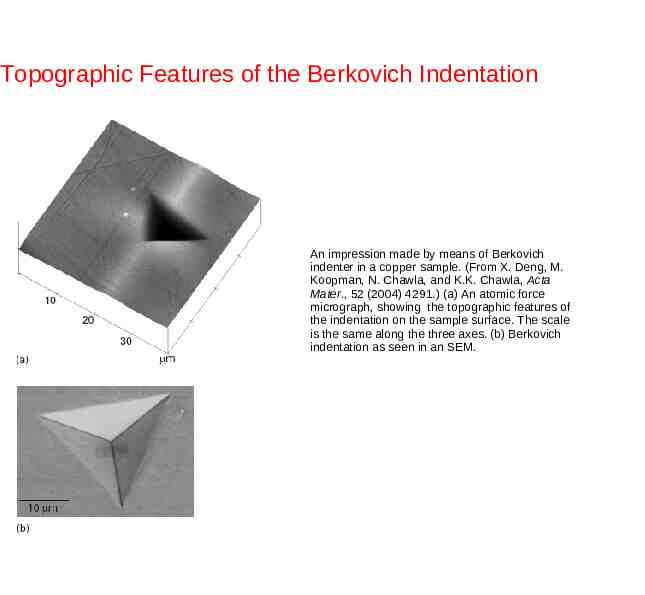
Topographic Features of the Berkovich Indentation An impression made by means of Berkovich indenter in a copper sample. (From X. Deng, M. Koopman, N. Chawla, and K.K. Chawla, Acta Mater., 52 (2004) 4291.) (a) An atomic force micrograph, showing the topographic features of the indentation on the sample surface. The scale is the same along the three axes. (b) Berkovich indentation as seen in an SEM.
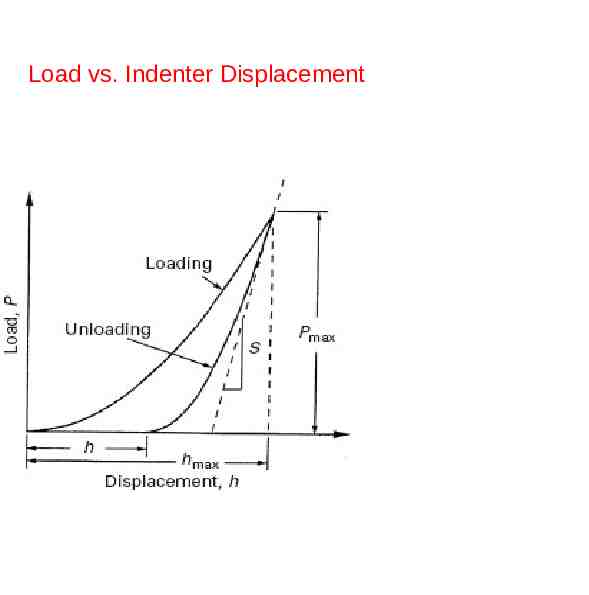
Load vs. Indenter Displacement
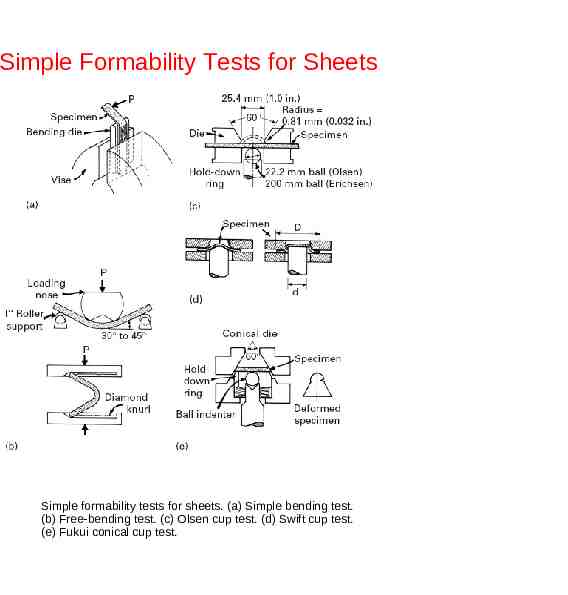
Simple Formability Tests for Sheets Simple formability tests for sheets. (a) Simple bending test. (b) Free-bending test. (c) Olsen cup test. (d) Swift cup test. (e) Fukui conical cup test.
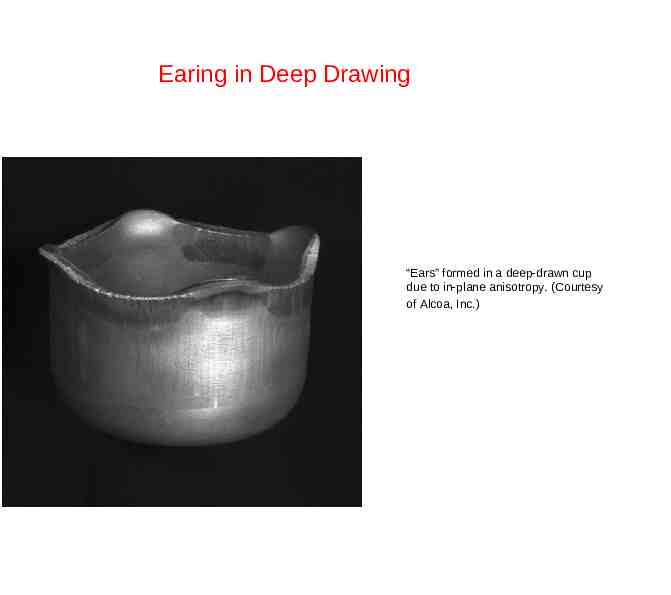
Earing in Deep Drawing “Ears” formed in a deep-drawn cup due to in-plane anisotropy. (Courtesy of Alcoa, Inc.)
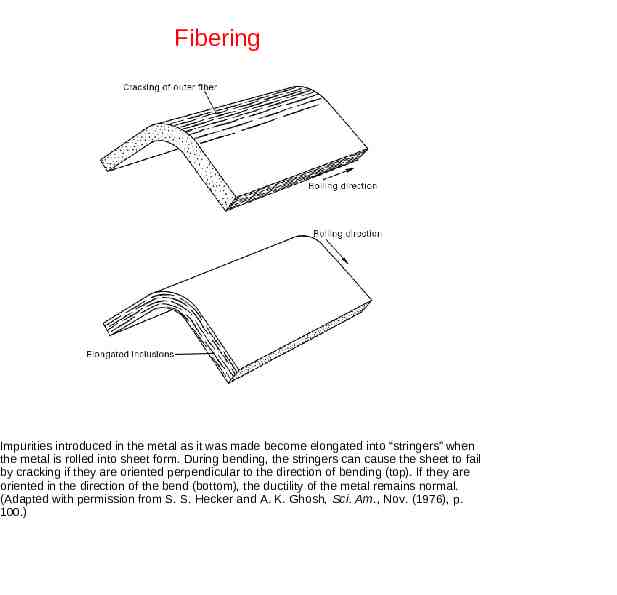
Fibering Impurities introduced in the metal as it was made become elongated into “stringers” when the metal is rolled into sheet form. During bending, the stringers can cause the sheet to fail by cracking if they are oriented perpendicular to the direction of bending (top). If they are oriented in the direction of the bend (bottom), the ductility of the metal remains normal. (Adapted with permission from S. S. Hecker and A. K. Ghosh, Sci. Am., Nov. (1976), p. 100.)
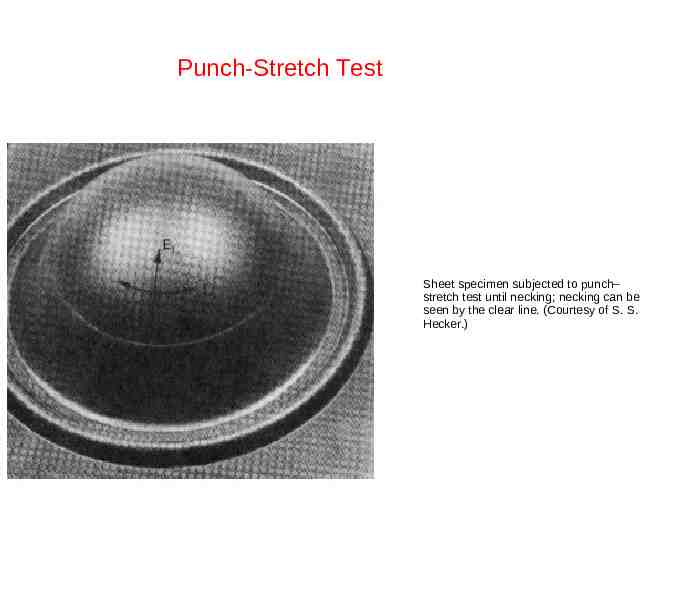
Punch-Stretch Test Sheet specimen subjected to punch– stretch test until necking; necking can be seen by the clear line. (Courtesy of S. S. Hecker.)
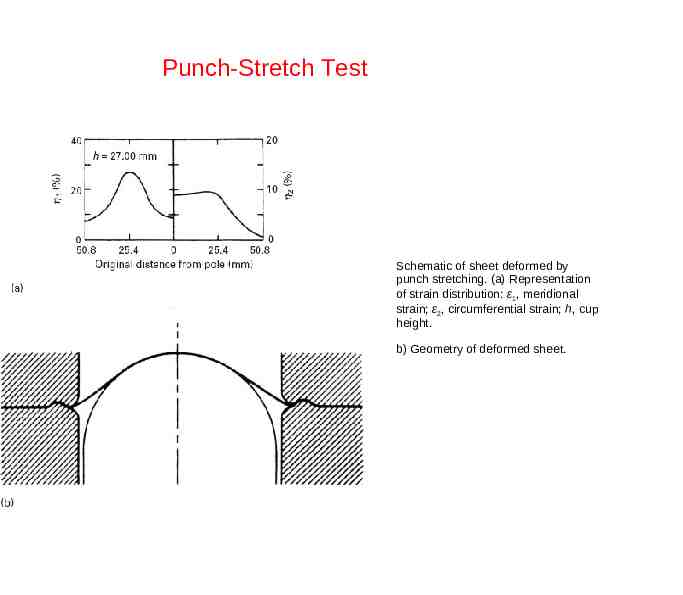
Punch-Stretch Test Schematic of sheet deformed by punch stretching. (a) Representation of strain distribution: ε1, meridional strain; ε2, circumferential strain; h, cup height. b) Geometry of deformed sheet.
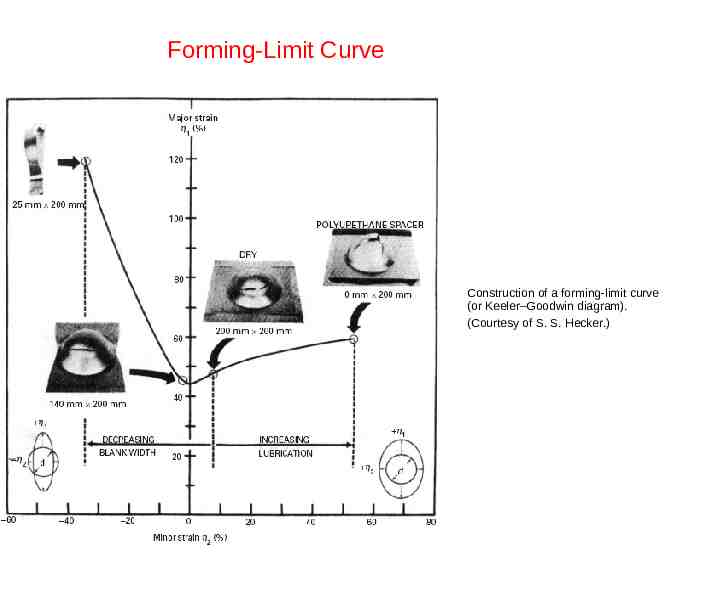
Forming-Limit Curve Construction of a forming-limit curve (or Keeler–Goodwin diagram). (Courtesy of S. S. Hecker.)
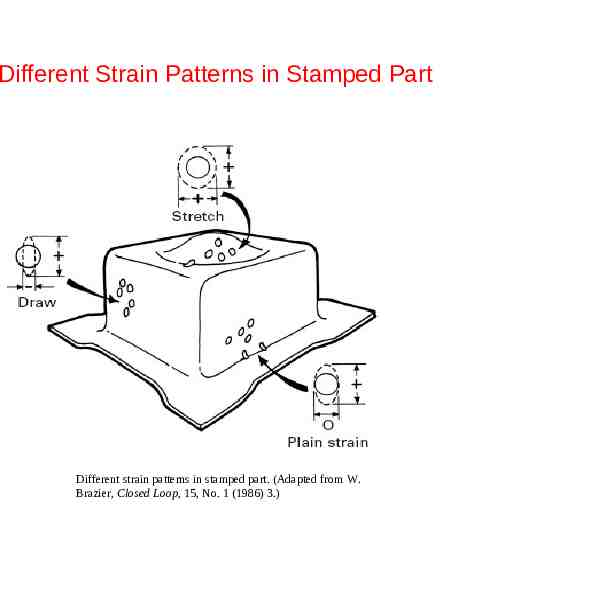
Different Strain Patterns in Stamped Part Different strain patterns in stamped part. (Adapted from W. Brazier, Closed Loop, 15, No. 1 (1986) 3.)
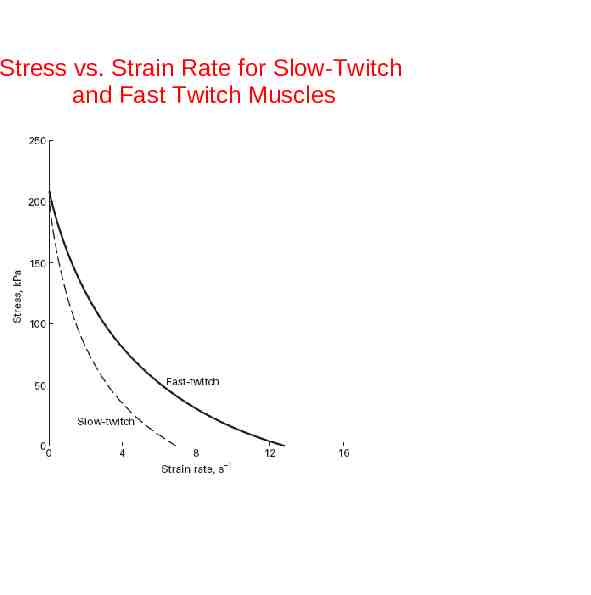
Stress vs. Strain Rate for Slow-Twitch and Fast Twitch Muscles
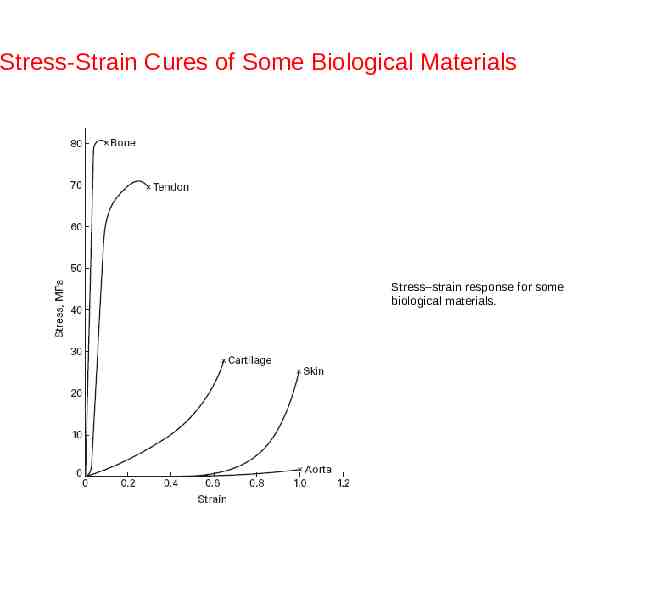
Stress-Strain Cures of Some Biological Materials Stress–strain response for some biological materials.
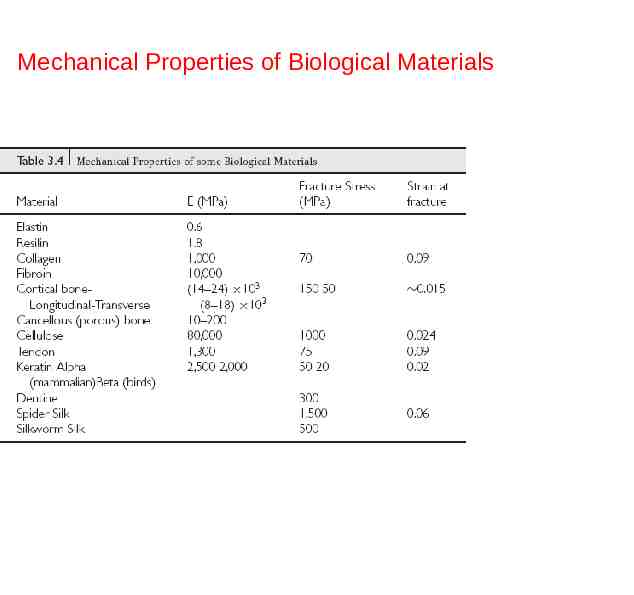
Mechanical Properties of Biological Materials
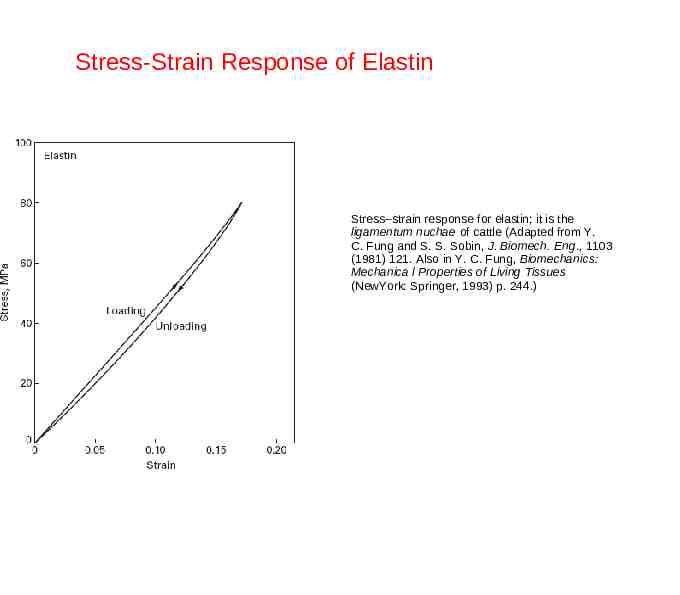
Stress-Strain Response of Elastin Stress–strain response for elastin; it is the ligamentum nuchae of cattle (Adapted from Y. C. Fung and S. S. Sobin, J. Biomech. Eng., 1103 (1981) 121. Also in Y. C. Fung, Biomechanics: Mechanica l Properties of Living Tissues (NewYork: Springer, 1993) p. 244.)
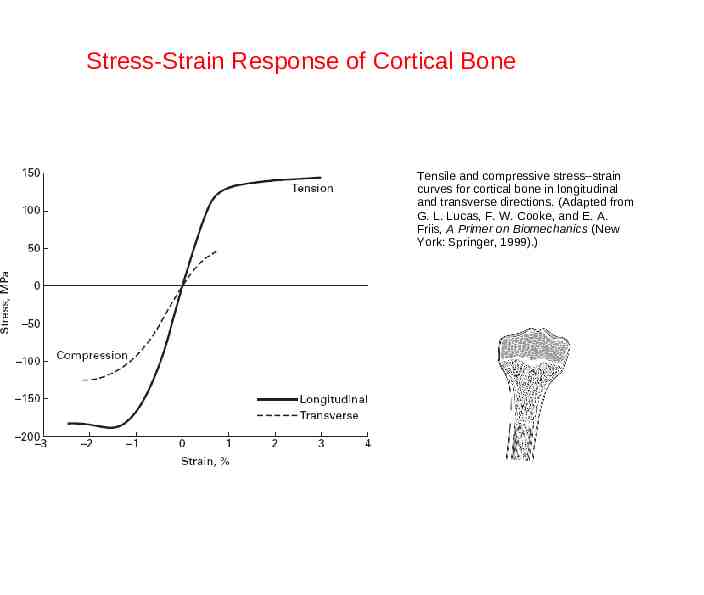
Stress-Strain Response of Cortical Bone Tensile and compressive stress–strain curves for cortical bone in longitudinal and transverse directions. (Adapted from G. L. Lucas, F. W. Cooke, and E. A. Friis, A Primer on Biomechanics (New York: Springer, 1999).)
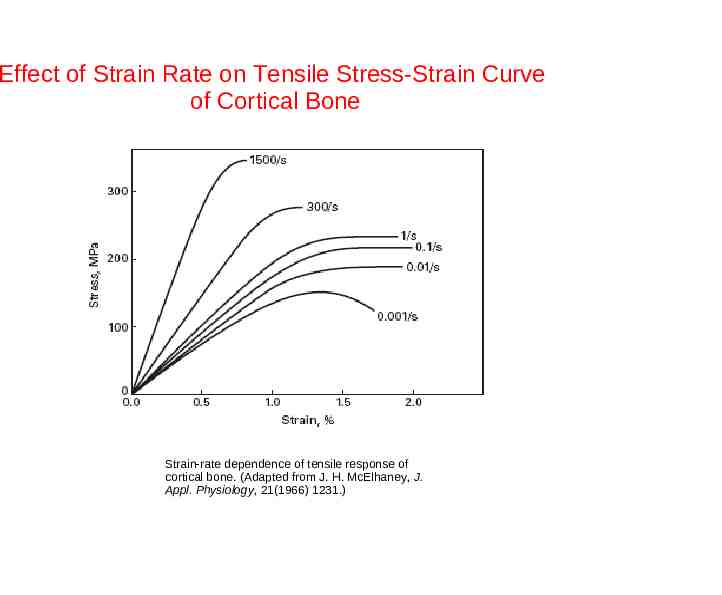
Effect of Strain Rate on Tensile Stress-Strain Curve of Cortical Bone Strain-rate dependence of tensile response of cortical bone. (Adapted from J. H. McElhaney, J. Appl. Physiology, 21(1966) 1231.)
